Opening Statement

I went to the woods because I wished to live deliberately, to front only the essential facts of life, and see if I could not learn what it had to teach
~Henry David Thoreau, Walden


Saturday, June 8, 2024

Ziv II Speakers -- Kit from Madisound, aka Ziv Two Speakers


Ziv II Build Notes:

I wanted to build some speakers that would meet several criteria that are challenging to find together in a commercial speaker:
  • Very clean, detailed sound -- characteristic of “audiophile” speakers
  • Ability to reproduce frequencies at least down to 60 Hz, so a subwoofer isn’t essential for music
  • Metal grill to survive or discourage cats, toddlers, and teenagers
  • Small form factor to fit into a bedroom or even mount on a wall
I want to enjoy having kids around, and not worry too much that my speakers might get damaged by a nerf ball being thrown around, or a pet getting interested in the grills.  In other words, I love good music, but in the end I wanted “dad speakers” as much as I wanted to build audiophile speakers.

The Ziv II speakers, which Madisound carries as a “kit,” seemed like a good starting point.
After building them, the Ziv II speakers impressed me in three ways:
  • Detailed resolution:  These speakers reproduce music in nearly all the detail present in the original recording.  Vocals are clear and natural, the attack of a drum or cymbal is well defined, the subtle sustain of softer notes is clear, and the instruments are well separated from each other.  Almost eerily, the quiet is quieter than I'm used to.  Notes begin and end crisply, so you get moments of silence that are very well defined, something that didn’t occur to me until listening to these speakers.
  • Uncolored tone:  Everything sounds very natural.  I notice this most in classical,  jazz, and vocals where my ears might be best attuned to what the live sound would be.  These speakers aren't "warm," which is a common, yet vague, term to describe certain types of distortion that many sound systems produce.  
  • Authoritative, crisp bass:  The F3 is probably somewhere near 55 Hz.  You get almost all the bass fundamentals in the music even without a sub.  I listen to music in my car and on earbuds a lot, and I’ve been reminded of how much of the low end is lost in those contexts.  There is a richness that surprised me in these little speakers.  Many smaller speakers have an F3 of around 80 Hz or even higher, so these are much richer than most small speakers, but don’t have the bass of good quality tower speakers.  More on this later.
People talk about speakers being “non-fatiguing,” and perhaps that’s the same idea as being forgiving of irritating recording anomalies.  These speakers don’t accentuate the static in older recordings, or the sonic artifacts of older microphones.  In that sense they aren’t as detailed and precise as some speakers, or maybe it’s some subtle engineering choice that Morel made.  In any case it’s very enjoyable to listen to older recordings as well as new material.  Yes, you can still hear microphone distortions on older recordings, and be irritated by the sound quality of garage recordings, but I find myself happy listening to almost anything professionally produced.

Some things worth noting:
  • Limited volume:  These speakers play at a good listening volume, but not dance-party loud.  You can reproduce jazz and classical music beautifully, but not at the volume of a live performance.  I would pair them with a receiver capable of clean sound at 80W at 6 ohms.  They sound great, but they definitely have a top end on volume.  These are great for a modest living room or large bedroom.  Not really suitable for larger rooms.
  • Limited low-end:   In terms of fundamentals, not much is happening between 30 and 60 hertz:  there is the bottom end of the kick drum, part of the kettle drum, a few cello notes, and the lowest piano and pipe organ notes that are hardly ever played.  So what are you missing?  It’s the resonances that reach down into the lower frequencies.  My current home theater speakers have an F3 around 40, and I have a sub for really low frequencies.  For some music you will notice this difference in a side-by-side comparison … but it’s not such an issue that you will necessarily care.  For home theater applications, you lose the low end of environmental noise:  ocean waves, the rumble of thunder, hoof beats, traffic noises, crashes and explosions.  So you might want a sub, but I prefer to leave it off personally.  
With rated power handling of 150W on the woofer you might think these could play really loud, but be realistic.  A normal 6.5 inch woofer can’t play below 60Hz at high volumes without distortion or exceeding it’s mechanical limits.  Physics gets in your way.  In a large room, a teenager might well “turn up the music” enough to wreck these speakers without a volume limiter on the receiver, so that’s something to consider when pairing these with a receiver.

Based on my previous experience I wanted to use a proven, engineered design.  I studied available “kits” and discovered the Ziv II at Madisound.  These speakers were designed by Russell Kauffman when he was Technical Director and Head of Acoustic Design at Morel, which is an Israeli company that makes high-end drivers.  Translated from the Hebrew, “Ziv” means "radiance, brilliance, or light of God," so I think that gives you an idea of the quality that he was going for with this design.  Mr. Kauffman designed the famous “Fat Lady” speaker, and the Ziv II uses the same 6.5” driver as that speaker.

Speaker “kits” are not like typical kits you might buy.  You get a box of components and a wiring diagram for the crossovers.  No instructions or further advice.  The drivers and crossovers with some miscellaneous parts cost me around $1,800, purchased from Madisound in 2024.  The components are definitely of a quality favored by audiophiles and the kit price is quite reasonable for what you get.

Madisound publishes the crossover design if you want to wire your own.  I had mine made by Madisound as part of the kit, opting for the upgrade of the tweeter capacitor to the Mundorf Supreme EVO Oil capacitor.  This capacitor is supposed to give the speakers even more detail in the high end than the standard capacitor.

The drivers are the Morel SCW-636 6.5” carbon fiber woofer and the Morel ST1048 supreme tweeters.  These drivers are characterized by very flat frequency response when crossed over at around 2,300 Hz.  The crossovers are relatively simple in design due to the linearity of these drivers.  Both drivers are very attractive and worth showcasing as examples of industrial design.

The recommended internal box size was 10.8 liters with a 6.5” long 2” diameter rear port to reach an F3 of around 55.  An F3 of 55 means that the decibel volume of the bass is at 50% of normal at 55 Hz.  This is remarkable bass extension for a speaker this small, and relatively close to the much larger JBL L100’s, which use a 12” woofer.  With a subwoofer crossed in at 60 Hz, the subwoofer contribution would be modest, so I consider a subwoofer optional for most purposes.  

Factoring in the displacement of the port, the drivers, and the crossovers, I needed about an enclosure with a total internal volume of 12 liters.  Using ¾” Baltic Birch as the material, the outside dimensions of the box are 15” tall, 9.25” wide, by 8.5” deep, not including the grill in front.  I used Baltic Birch over MDF primarily because I like working with Baltic Birch, and at the small box size I thought that there wouldn’t be much of an issue with resonance.  This turned out to be wrong however, and I ended up sinking twelve #12 x 4” screws into each box as a modification to cut the unexpected vibration.  

For this small of a speaker, no fancy joinery is necessary.  I used butt joints stiffened with WeldBond and connected with countersunk #6 and #8 screws.  Weldbond has a long open time, so I could assemble the boxes completely without rushing.  In retrospect, I should have used longer screws and more of them to cut the resonance further.

Space is at a premium on the front baffle, so given the size and length of the port I decided to offset the tweeter from the centerline, and on the back, the port is also offset to separate the end of the port from the tweeter.  

Two speakers can be cut out of ½ of a 4’ x 8’ sheet of Baltic Birch, so I made all my box pieces out of half the sheet of plywood with some left over.  Machining the wood was straightforward.  I used a circle jig and router to create the mortised openings for the tweeter and woofer.  I used 6-32 t-nuts for the woofer, tweeter, and terminal plate.  They don’t take much time to install, but I’m not sure that I would use them again.  The main advantages are that you can test fit everything, and later you can get the drivers really tight against the baffle.  However, it’s necessary to use thread locker at some point or there is a chance that the screws can loosen over time.

For the grill I used 16 gauge high-flow steel perforated sheet with a hexagonal hole pattern and 79% open area.  I got mine from McMaster Carr.  Metal grills are undoubtedly less acoustically “transparent” than thin, lightweight grill fabric, but they are much more pet and toddler proof, and it gives us a chance to see the beautiful Morel drivers.  Since the steel mesh doesn't stop UV light, speakers with this style of grill should not be placed in the direct sun.  Steel takes primer and spray paint quite well, and usually holds up in an interior location without rust if painted properly.  The grill material that I got was ductile and easy to work with.  I did not try aluminum, which is also available.  Stainless steel is available, but it does not take paint very well.  I’d like to try it another time though without paint.

After using a 3” abrasive cutoff wheel to cut the grill to size, I used a bench grinder and abrasive deburring wheel to cut off and lightly polish the nibs.  I found this less time consuming and easier than it sounds.  I also tried cutting the 16 gauge sheet with tin snips, which did not work well, and diagonal cutters, which did cut it quite easily one wire at a time.  I notched each corner and bent the edges with a bending brake so that the grill would be ¾” off the front baffle.  Careful work with a rawhide mallet would also work I think.  To affix the grill to the front baffle, I used ⅝” x ⅝” x 3/64” angle anodized aluminum, with the grill affixed to the angle aluminum using JB Weld “original” formula epoxy, applied with a static mixing syringe, which is probably the only way to get a good bead.  If I was doing this again, I would use ½” x ¾” x 1/16” angle anodized aluminum to give more room for the 8-32 screws that I used to affix the angle aluminum to the front baffle.  The ⅝” works, but the clearance is tight.  The 8-32 screws went into zinc-plated steel threaded inserts, threaded into the front baffle.  This is pretty easy to do, but the ¾” inch angle would provide more distance from the edge.

I wanted the main finish to be slightly off-white, but not in a beige direction.  Rustoleum has a Pearl White in their Universal Spray Paint line that I decided to try.  I primed the grill with with Rustoleum’s self-etching automotive primer.  The wood was prepped with a regular all-purpose wood primer applied with a foam roller and foam brush.  Then it’s just a matter of carefully applying the pearl white layer.  Just as a side note, Rustoleum makes an automotive lacquer in Pearl White as well, but the lacquer has aggressive solvents and can’t be applied directly over the self-etching primer, so I went with the regular spray paint.  The lacquer would be worth trying as well and it’s supposed to be more durable than the regular paint.

Things I might do differently next time:
  • It would be good to provide explicitly for wall mounting, including installing threaded inserts to accommodate that easily, maybe in a Vesa 100 pattern.  The speakers weigh about 18 pounds, so wall mounting requires a heavy-duty bracket.
  • I would add more long, heavy screws to cut the box resonance and vibration further.
  • The binding posts take up a lot of room on the back.  I would try to use a less space-intensive set of posts so there is more room on the back for a wall mount.
  • As mentioned before, I’d use ½” x ¾” x 1/16” anodized aluminum angle to hold the grill.
My brother Andrew was an audiophile and got me interested in high-end audio.  I also have a couple of friends who are audiophiles with the gear to prove it.  I love the way that their systems sound, but I’m not interested in that kind of investment and space commitment.

Earlier I built speakers using a HiVi F10 as the woofer and loved the sound, but they can’t handle a lot of volume.  Then I built some 3-way tower speakers and a 3-way center channel using Morel’s mid-level drivers and custom crossovers from Solen.  The tower speakers sound very good, but I had to use the equalizer built into my Onkyo receiver to fine-tune the sound.

These experiences convinced me to go with a design so that the speakers can just be plugged in and will sound great without a lot of adjustments.

Wednesday, May 24, 2023

Definition of a PCT Thru Hike -- Room for Opinion?


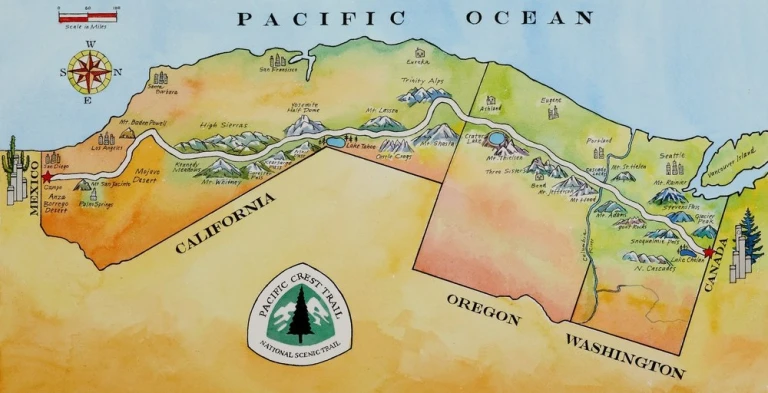
Hike the whole PCT in a single season and you have completed a thru hike.  That's simple, but on a 2,650 mile trail there are a lot of little variations that can cause heated debates about whether someone is TRULY a thru hiker.  In my experience this debate reaches a peak on trail in the first few hundred miles, and then gradually people get a bit less stringent in their thinking.  By Washington most people aren't obsessing about it much anymore.  Your friends at home don't care at all.

My purpose here is just to highlight some of the most common variations on a strict thru hike.    Language flexes to fit reality, so I won't try to force my opinion as to what is really a thru hike.  If you have an opinion, feel free to share it in the comments.  In my experience, as with many topics, people with strong opinions on this are often vocal without representing a majority view.

As a starting point, some people who identify as "purists" define an unsupported PCT thru-hike as follows:

Starting at either the southern or northern monument, hike in a single direction, on all of the available PCT track, with connected steps, with no break of more than one day at a time, and without support to the other monument.  

When there is a closure, hike to the closure sign and then backtrack to get off the trail.  Then get back on trail and hike to the opposite closure sign and then reverse direction and continue your hike.

Sometimes instead of "no breaks" it will be "in a single season."  Either way, obviously that's a thru hike.  However, I'll describe some of the 14 variations that I have seen that in practice, on the trail, many people still consider a thru hike:

Uncontroversial:

  • Connected-steps resupply detours.  This would be, for example, departing from the PCT track on foot at Mt. Laguna to resupply and then returning to the PCT track on foot a little farther on, rather than backtracking to where you left the PCT and restarting from that point.  Typically these detours add a little distance rather than being shortcuts.
  • Hiking Popular Alternates.  The Crater Lake alternate and the Tunnel Falls alternate, for example, are not official PCT routes, but many, many hikers take them, and they are more interesting than the PCT track.  Detouring to summit Mt. San Jacinto, Mt, Baden Powell, or Mt. Whitney also typically involves detouring around a bit of PCT track, and no one blinks at these choices.  Getting to and from campgrounds also can involve short missed sections of PCT track.
  • Taking personal days off:  Taking a few days off in town to recover from an injury is necessary for many hikers and really not controversial.  I had to do this in both 2017 and 2018.  People also sometimes take time off for weddings or other family events.  I've seldom heard this questioned, even though it's technically a break in your hike.
  • Tiny Gaps in Connected Steps:  This usually means something like getting picked up for a resupply stop on one side of a road and getting dropped off on the other side.  You miss something like 25 steps.  I did this at Big Bear, for example.  Very few people care about these micro breaks in your connected steps, but some people do.  When you are actually out on trail, crossing a busy road on foot in both direction just to connect your steps across that short distance might seem like lunacy ... or not.  It depends on the person.

    Varying Opinions:
    • Closure Alternates and skipping open PCT track.  A fire closure might typically be a few miles past the closest trail or road crossing that would allow detouring around the fire closure.  The PCTA will usually publish an official alternate route, which is then considered to temporarily be the official PCT track.  Some people think you should still do an out-and-back to the actual closure, AND hike the alternate.  Most people, like me, just hike the alternate.  
    • Hiking Through Closures:  This means ignoring the closure signs and just hiking through a closed section.  This is illegal and disrespectful toward the people who built and maintain the trail.  It often adds additional work for people repairing that trail section.  Don't get me wound up.  I never do this, but it doesn't seem to bother some people.
    • Getting off Trail to Avoid Bad Weather:  Some ultralight hikers really aren't carrying adequate gear for cold, wet weather.  In some cases hikers will get off trail and check into a hotel to wait out the weather.  I avoid this, but I was already checked into a hotel at Snoqualmie pass for a resupply stop and did stay an extra day to avoid a full-day of hiking in the rain.  This borders on supported hiking.
    • Slack Packing:  This means hiking with an almost empty (aka slack) pack or just a day pack while someone else drops you off in the morning and meets you in the afternoon.  It's a form of supported hiking.  It's not a big deal to me, but opinions vary.
    • Personal Trail Angels:  Enjoying a soda from a cooler left by a trail angel is uncontroversial, but if you have someone meet you at almost every road crossing that becomes a supported thru hike.  The same would be true of having someone routinely meet you with a resupply.  Still a great hike, but now a supported hike. 
    • Temporary Skips and Flip Flops:  Fire closures can sometimes halt forward progress, and snow and dangerous stream crossings can make a straight-through hike more-than-usually risky some years.  In 2017, which was a high snow year, two hikers drowned on stream crossings and many others had close calls.  To reduce risks, some hikers will rearrange the order of their hike by skipping ahead and changing direction, or skipping a section and coming back to hike it later.  I've done both.

    Intentional Skips and Gaps:

    All of these are avoidable breaks in your connected steps.  Whether they are meaningful to your own goals for the hike varies by individual.
    • Intentional Skips at Town Stops:  There are a few town stops, such as Idyllwild, Wrightwood, Big Bear, South Lake Tahoe, Sierra City, Seiad Valley, and Crater Lake where you can hike in or get a ride in at one point and hike out or get a ride out to a point further along the trail.  This usually results in skipping at least a few miles of trail.  Other than getting around the closure south of Idyllwild, I did not do any of these skips, but I met many people who did them.  When I hiked the steep five miles from Mazama Campground to the Crater Lake Rim, I would estimate that at least 80% of PCT thru hikers took the Crater Lake shuttle bus instead.
    • Catch up to Tramily Skips:  Many hikers get into a trail family that is socially very close and improves their safety.  When an injury or equipment failure causes one hiker to need a few days in town, they sometimes skip ahead to the next town stop to rejoin their trail family.  Keep in mind that for women, persons of color, and LGBTQ hikers safety is often a bigger concern than for white cisgender men.  To me these skips seem like smart hiking and a reasonable tradeoff against a connected-steps goal.  
    • Closure skips that don't get made up:  Sometimes a closure is so awkwardly placed that the official alternate is a 40 mile road walk.  Often hikers will just skip ahead when faced with this type of closure.  Sometimes the closure opens, and sometimes it stays closed the whole season.  In the end your hike might have a 40-mile gap in it.  How big a gap you can have and still consider it a thru hike is kind-of up to you.  On a 2,650 mile trail missing 40 miles would not stop most people from considering themselves to have finished the trail.  I did not have to deal with this personally, although I did bounce around a lot to get all my miles done.
    • Rides at Road Walks:  There are some places where the PCT or an alternate is on a paved road.  Hiking on pavement is hard on your feet and knees, as well as contradictory to the whole point of the hike, but even so, usually I walk these.  Once at Castella I felt awkward when a Sherriff's Deputy offered me a ride so I got in and skipped a mile of pavement that way.  Another ride I took that resulted in a break in steps was in Washington when a fire-closure put me on a trail that ended at a busy road with no good shoulder to walk on safely.  I got a ride up to White Pass in a jeep, which was fun.
    So, because of trail closures, town stops, alternates, trail dangers, and other factors, what someone means by the term "thru hike" will often vary a little from the simple idea that first pops into our heads when we hear the term.  Most people will say that they did a thru hike if they hiked at least 95% of the trail in one season, but at least got from one monument to the other.  Some people will consider that a failure.  Feel free to have your own opinion.  ^-^

    Sunday, May 21, 2023

    Why I Love Hiking


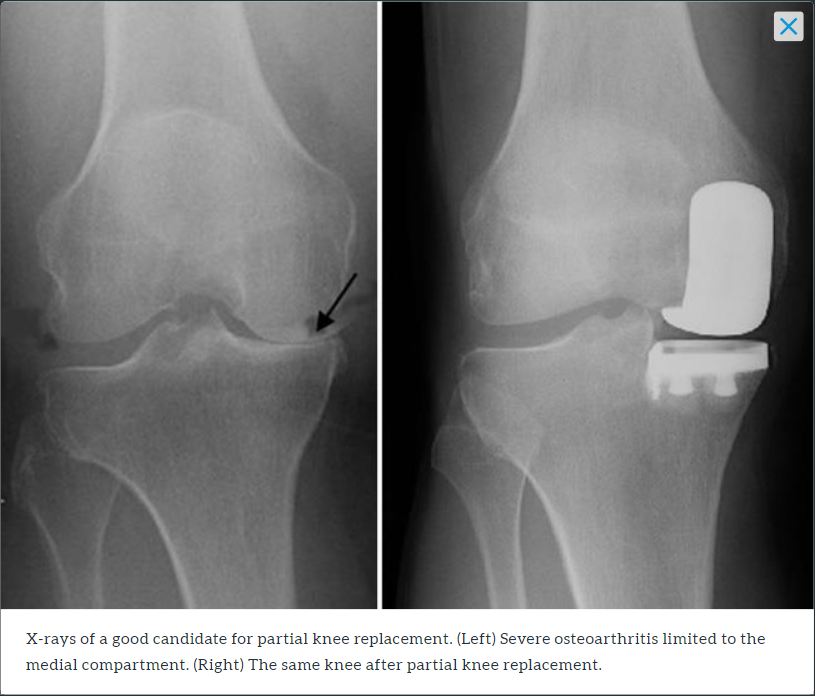
    This isn't my personal before and after x-ray, but mine looks very similar.  Four days ago I had a partial knee replacement on my right knee.  This is the knee that took me off-trail in 2017, 2019, and 2022.  Basically I had a pretty bad tear in the meniscus, but only in the medial compartment.  My initial recovery is going well, and ideally I should be able to day-hike as early as August, just three months after the surgery.  

    Resting and recovering has given me plenty of time to just sit and think, and with the prospect of a working knee I've started thinking about backpacking again.  I've also watched some PCT thru-hiking videos and I've thought more about the experience of long-distance hiking.

    As context, I hiked the PCT in 2017, but didn't quite finish, partly due to my knee and partly due to the heavy snows that year.  Then in 2018 I did a full-hike of the PCT in one season, aka a thru-hike.  I've chipping away a little at the miles that I missed in 2017 and have about 250 miles to go to finish a "section hike" of the PCT as well, which I hope to be able to conclude in 2024.

    Completing the PCT is a significant accomplishment.  It requires persistence, effort, endurance of discomfort, toleration of risk, and skills, especially during stream crossings and crossing steep snow fields.  Overcoming injuries and pain is almost inevitable during a long hike.  Many hikers will fall at least once during a thru-hike, and many will have to overcome blisters, sunburn and other over-use injuries.  Snow-covered trails, fire closures, difficult weather, and finding water require problem solving.  Conditions sometimes require hiking at night or in very uncomfortable weather.  All together, when a hiker finishes the trail they have achieved something.  

    At the same time, it's possible to develop a grandiose assessment of this attainment.  You can quickly confirm this tendency by watching a few "my PCT hike" videos on YouTube, where hikers conquer "heinous" mountain passes on their "epic" journey.  It is after-all just a lot of hiking on a rather well-maintained trail not too far from civilization.

    Looking back from the age of 66, five months thru-hiking the PCT does not stand out for me as a singularly defining milestone in my life.  Married life, having a career, raising children, and renovating our property all took more time and effort.  Getting up everyday and hiking was easier in many ways than getting up every day and working a corporate job.  So, this is a very roundabout way of saying that the "achievement" aspect of hiking isn't too important or meaningful to me.

    Despite vague expectations that hiking the PCT might be a deeply spiritual and life-altering experience, most hikers find that the changes to their perspective are subtle.  Attitudes toward cleanliness, creature comforts, and food shift, but after a period of readjustment most people get reintegrated into ordinary life within about a month, and this was true for me as well.

    So, what is it about hiking the PCT that is so compelling, so enticing, so invigorating, and so addictive that people will quit their jobs and take six months out of their life to hike the trail?  Here's my own working list of what typically makes the experience worthwhile:

    • The Beauty and Diversity of Nature:  To some degree just the number of hours of walking combined with the many different ecosystems that you will walk through give you opportunities to see nature in more of it's variety and beauty than if you just went to an arboretum or visited the many different viewpoints along the road.  To be sure, there is a lot of repetition, but the constantly changing landscape keeps it interesting.  I have a friend who only wants to see the most spectacular vistas.  If that's you, then you will be disappointed by the PCT.
    • Immersion in Nature:  During a long hike you are immersed in nature far more than on a day or weekend hike.  You aren't even sleeping in campgrounds, just finding a flat spot to throw down your tent at the end of the day.  You are drinking water from streams.  When the sun goes down the air gets cold, and in the afternoon it can be baking hot.  When it rains you are wet, and in a storm sometimes you can't see 100 feet.  Where there is a ridge you hike up and over it, and where there is a valley you hike into it.  That intimacy with the landscape and the realities of nature is uniquely soul satisfying and it really kicks in after weeks rather than days.
    • Constant Awareness and Attention:  Without overstating the risks, when on a long hike you can never forget about water, weather, where you can camp next, your own body, and your very-next step on the trail.  It's not a high level of attention, but it's constant, and this gives it an almost meditative quality.  Your mind can wander, but part of you needs to stay with the hike all the time.  If you snap off a hiking pole by not paying attention, you can't just pop down to the store and get a new one.  If you step on a loose rock and sprain your ankle, you could suffer a lot limping off the mountain.
    • Operating Near your Limits:  The experience of hiking nearly to exhaustion day-after-day is strangely invigorating.  Rather than feeling oppressed, you feel completely vital and alive.  You come close to your limits, ideally without crossing over into over-use injuries.  Some people try to find their limits by doing the "24 Hour Challenge:" trying to cover as many miles as possible in 24 hours.
    • Kinesthetic experience:  I ran into a woman on trail near Big Bear who was about to quit her hike for the reason that "hiking is boring."  If you don't enjoy the movement of your body as you swing down the trail, there can be many miles that will simply seem monotonous.  Hiking through a forest, there isn't a lot of variety visually, but (when I'm not in pain) every step has a kinesthetic pleasure within it.  This feeling often builds as your body gets stronger.
    • Social Experience:  At a minimum, most of us enjoy the simple comradery of a shared experience.  When on trail you feel like you belong to an exclusive club.  Even if you aren't tightly connected to a hiking partner or a "trail family" you will inevitably run into other hikers, make friends, hike together, share life stories and meals together.  It's pleasant and affirming.  Trail angels also create a positive social experience along with snacks and rides into town.  Many people make long-term friends hiking the trail together.
    • A Different World:  In the simplest terms, in long-distance hiking I've gotten used to hitch hiking, night-hiking, USPS general delivery, Amtrak, Greyhound, coin-operated showers, bumming TP from strangers, and the wonderful properties of Ibuprofen.  I've met nurses, pilots, financial wizards, wildlife biologists, baristas, and smoke jumpers.  I've eaten tortillas with peanut butter, ramen with fresh eggs, and way too many kinds of freeze dried dinners.  Variety and change is good for us.
    I'd be interested in other people's experiences and thoughts on hiking or whatever you enjoy.

    Thursday, December 29, 2022

    Van Insulation - the Math Behind Staying Warm (or Cool)

    A lot of factors go into staying warm.  My purpose is just to explain the math behind insulating a van so that the inside air temperature is comfortably warm on cold day.  Most of the math also applies to staying cool. We want to understand:

    1. Keys to construct a well-insulated space, and what is achievable
    2. How much heat is required to heat an insulated van
    3. How to provide that heat

    Keys to construct a well-insulated space, and what is achievable

    In conceptual terms the answer is quite simple.  Have as many well-insulated surfaces as possible, and as few poorly insulated surfaces as possible.  So what do we mean by a well-insulated surface?  Let's pretend that a van is a rectangular box with a heated space with dimensions of 6' x 6' x 12'.  This would be an enclosed space of 432 cubic feet, with a surface area of 360 square feet.  The 360 square feet is the critical number because heat crosses a boundary measured in square feet.  So the idea is to have as much as possible of that 360 square feet well insulated.

    The most important formula for us to keep in mind is the relationship between insulation value and energy needed to keep the inside warmer than the outside.  Here is the engineering formula in concept:

    [Heating load] = [surface area] x [temp. difference] / [insulation value]

    You can easily see that increasing the insulation value will reduce heating load.  Double the insulation value and you cut the heating load in half.  In Imperial units, heating load is measured in BTU/hr, and insulation value in R-value.  If we add the all measurement units this looks a little more complex, but it's still the same formula.

    [BTU/hr] = [Surface Area (sq. ft)] x [Temp Diff. (deg F)] / [R-value (ft2·°F·hr/BTU)]

    So, if we want to reduce the heating load, we want to cover as much of the square footage as possible with good insulators.  In quantitative terms, this means materials with a high R-value.  R-value has a convenient characteristic.  When we make a composite material out of two materials we can just add their R-values together to get a composite R-value.  So a material with an R-value of 1 combined with a material with an R-value of 2 has an R-value of 3.

    Here are the R-values per inch of  some materials typically found in a van build:

    R-value per inch by MaterialR-value per inch
    Rigid foam - Polyiso6.00
    Industrial felt (used for a thermal break)4.00
    Closed cell foam - Ensolite4.00
    Wool - Havelock Wool3.60
    Synthetic Fiber - Thinsulate3.30
    Double-paned glass1.60
    Plywood1.25
    Single-paned glass0.91
    Steel0.03

    These are all quoted "per inch."  Thinsulate is typically installed at a thickness of about 1.5", so you can get possibly get about R-5 from it.  Don't always believe the optimistic ratings from manufacturers though--that's what they achieved in the lab, not in a real build where some of the insulation is compressed.  Compressed insulation will deliver less insulation value, but a van is so oddly shaped that you will end up cramming insulation into oddly shaped cavities as often as you are installing it in beautiful flat sheets.  Plywood paneling is typically installed at 1/4 inch, or a bit less, so it only typically contributes about R-0.3.

    A well-insulated wall or ceiling could be as high as R-10 in places, but will typically be all the way down to just better than R-1 where plywood has been attached directly a steel framing member.  Windows are difficult to insulate, as are the doors.  Putting up close fitting thermal curtains and using thermal window coverings can cut heat loss at least in half for windows and doors, so that's a common approach to staying warmer at night.

    So, in addition to using good insulation wherever possible, three practices can also make a big difference: use a thermal break of at least R-1 when attaching anything to the van's metal framework; don't leave any steel elements fully exposed to the heated space; and, put coverings over any poorly-insulated areas at night.

    I'm not going to get into the physics of this, but there is a bonus R-value caused by trapping air.  If you can trap 1/2" to 4" of air in part of the build, you get about R-1 from the trapped air if it's static, so some of the van structure that is hard to insulate at least has some inherent insulation value.  Also there is a boundary effect of still air against the interior of the van.  It gives the effect of about R = 0.7 on the inside of the van if you aren't running a circulating fan.  The outside also gets some value from this boundary layer if the air is still, but you can't really count on that.

    Based on the materials involved and real-world experience, even with your best efforts, it's very unusual to achieve an overall performance of better than R-5 for the heated space, and R-3 is probably much more typical.  Although we are a bit light on empirical measurements, it's probably fair to describe van insulation performance in five categories:
    R-1:  just factory headline insulation and air pockets in a cargo van - aka uninsulated
    R-2:  lightly insulated
    R-3:  well insulated, but exposed windows and doors
    R-5:  very-well insulated with treatments for all surfaces
    R-7:  super-insulated van

    So, with these insulation values in mind ...

    How much heat is required to heat an insulated van?

    Given our assumption of 360 square feet for the surface area of the heated space, we can calculate the heating loads for various outside to inside temperatures.  To make the table easier to read, let's assume a target of 65 deg F. for the inside temperature, and then we can use the outside temperature as part of the table.

    BTU/hr by Outside Temp. to maintain 65 deg. F. internal temp., by insulation level
    Outside Temperature (deg. F.)
    BTU/hr by Insulation Level55453525155-5
    R1: uninsulated3,6007,20010,80014,40018,00021,60025,200
    R2: lightly insulated1,8003,6005,4007,2009,00010,80012,600
    R3: well insulated1,2002,4003,6004,8006,0007,2008,400
    R5: very-well insulated7201,4402,1602,8803,6004,3205,040
    R7: super insulated5141,0291,5432,0572,5713,0863,600

    So, to be comfortable at an outside temperature of 35 deg. F., with a van insulated to R3, you will need about 3,600 BTU/hr of heat.  And at an outside temperature of 15 deg. F. you would need 6,000 BTU per hour.  

    How to provide that heat

    There are a lot of ways to bring heat into a van, so I'll just mention three popular options with their capacities.  If you are somewhere you can plug-in to an electrical outlet you can use a typical 1,500 watt electric heater to provide heat.  The conversion to BTU's is Watts x 3.41 = BTU's, so 1,500 watts will heat at  5,115 BTU/hr, which would keep you warm down to below 25 deg. F. in an R-3 insulated van.  That might be the right answer when parked at home or if you happen to be staying at a campground with hookups.  Espar and Webasto fuel heaters are popular; they both have 7,000 BTU/hr models and some larger models also.  Propex offers a propane heater that puts out 6,350 BTU/hr and they also have a larger model.  This is far from an exhaustive list.

    This post hasn't covered the whole topic, but it's a start at understanding the capacity of the heating system required, and some of the issues related to insulating a van.  It's also important to not get too starry-eyed by the R-value insulation rating of some insulating material, and keep in mind that a van is very hard to insulate to a high R-value due to the windows, doors, cab area, and the uneven shapes.

    Conclusion

    Take insulating your van seriously and you can get to R-3 without extraordinary effort.  Beyond that level you will be working harder at it than most DIY builders.  You can check the table above to see what size heater you will need at a minimum.  I think the models that put out 6,000 to 7,000 BTU/hr will satisfy most people, but if you live in a really cold climate it makes sense to get the larger model.  

    Friday, August 5, 2022

    Olallie Lake to Timberline Lodge - 8/2/2022 to 8/4/2022


    Mount Hood 

    Christine drove Lori and me to the trailhead at Olallie Lake, finishing the last few miles on a gravel road.  Olallie Lake was the northern limit of the fire closure order when we hiked this section.

    After hiking through a burn area we were in healthy forest for most of the hike.  There were a few picturesque spots leading up to Mount Hood, which really is the star of this section. 

    Our mileages we're about 12, 17, 15, and 6.  The last day we made it to Timberline Lodge at 9:30 am and enjoyed their famous breakfast buffet.  Lori ate an equivalent of approximately three meals by piling her plate high.

    After eating we got Lori's resupply box and then said our goodbyes.  My arthritic knee had become stiff, painful, and maybe a little unstable, so I went back to Portland while Lori hiked on 

    The trip back to Portland consisted of two buses, one light rail trip and a walk of less than a mile to our friends house.  The trip cost $4.25 total, which seemed incredibly cheap to me, and it was also pretty quick.

    Not too many photos in the album this time, but a few good shots of Mount Hood.

    Olallie Lake to Timberline Lodge 2022